
Before you start
You'll need:
- A 64-bit PC with UEFI. Almost every PC from the last twelve years. Macs with an Intel chip work too; Macs with Apple chips don't.
- 4 GB of memory, 8 GB for games.
- 40 GB of free disk space. Zurbax needs at least 16 GB; the rest is for your files and games.
- A USB stick of 16 GB or more. Everything on the stick is erased.
- About 30 minutes.
Download
One image for nearly every computer: the system, GNOME, Steam and Proton, eight apps, and the drivers for nearly every graphics card, Wi-Fi chip and controller. About 7 GB; it installs without the internet.
For a 4 GB stick, zurbax-standard.iso is 3.5 GB: the same, without the second and third groups of ready apps, which you can get from Harbor later.
Each file's SHA-256 checksum is in SHA256SUMS, if you'd like to check that the download arrived whole.
Make the USB stick
The file has to be written onto the stick, not just copied. Use one of these free tools:
- 1
Get a tool
balenaEtcher works on Windows, Mac and Linux. On Windows, Rufus is quick too.
- 2
Choose the file
In balenaEtcher, press Flash from file. In Rufus, press Select. Pick the Zurbax file you downloaded.
- 3
Choose the stick
Pick your USB stick. Check it's the right one: everything on it is erased.
- 4
Flash
Press Flash (or Start in Rufus). If Rufus asks how to write the image, choose DD image mode. It takes a few minutes.
Start from the stick
Plug the stick in, restart the computer, and press the boot menu key straight after it powers on, a few times. Pick the stick in the menu (it's often listed as UEFI: and the stick's name).
| Computer | Boot menu key |
|---|---|
| ASUS | F8 or Esc |
| Acer | F12 |
| Dell | F12 |
| HP | F9, or Esc then F9 |
| Lenovo | F12, or the small Novo button |
| MSI | F11 |
| Gigabyte, ASRock | F12 or F11 |
| Microsoft Surface | Hold Volume down while pressing power |
| Mac with an Intel chip | Hold Option |
Zurbax starts with your computer's own logo and a spinner, then opens the Welcome window. Choose Try Zurbax to look around first. Nothing on the computer changes while you try it.
Install
In the Welcome window, choose Install Zurbax. The installer has four steps down its side:
- 1
Disk
Pick the disk for Zurbax. Each one is shown as a bar of what's on it now. The stick you started from can't be picked.
- 2
Install type
Erase disk and install uses the whole disk; everything on it is deleted. Install alongside Windows uses the disk's free space and keeps Windows and its files. The bars show the disk now and after.
- 3
Summary
Check the disk and the type. Nothing has changed yet; press Install, or Erase and Install.
- 4
Installing
A few minutes, with a slideshow and the time left. Keep the computer plugged in. When it's done, remove the stick and press Restart Now.
The first start
After the restart, Welcome sets Zurbax up in a few steps. Each can be skipped and changed later in Settings.
- Keyboard: the layout printed on your keys. Type in the box to see each key light up.
- Wi-Fi: only shown when there's no cable. Pick your network and type its password.
- Time zone: search for your city. The clock swings to its time.
- Account: your name, and a password if you want one. Zurbax asks for it at start-up and before big changes.
- Look: Carbon (black and orange) or Midnight (deep blue and violet), an accent colour and a wallpaper. The setup itself changes colour as you pick.
The apps that come with Zurbax install themselves in the background the first time you use one of Zurbax's Linux apps, Steam or GNOME, so they may take a few minutes to appear.
Starting Zurbax or Windows
Zurbax adds itself to the computer's start-up and starts on its own, with no menu in between. To start Windows instead, press the boot menu key (see the table above) while the computer powers on and choose Windows Boot Manager.
Want Windows to start by default again? In the computer's setup (Del or F2), move Windows Boot Manager above Zurbax in the boot order.
Getting around
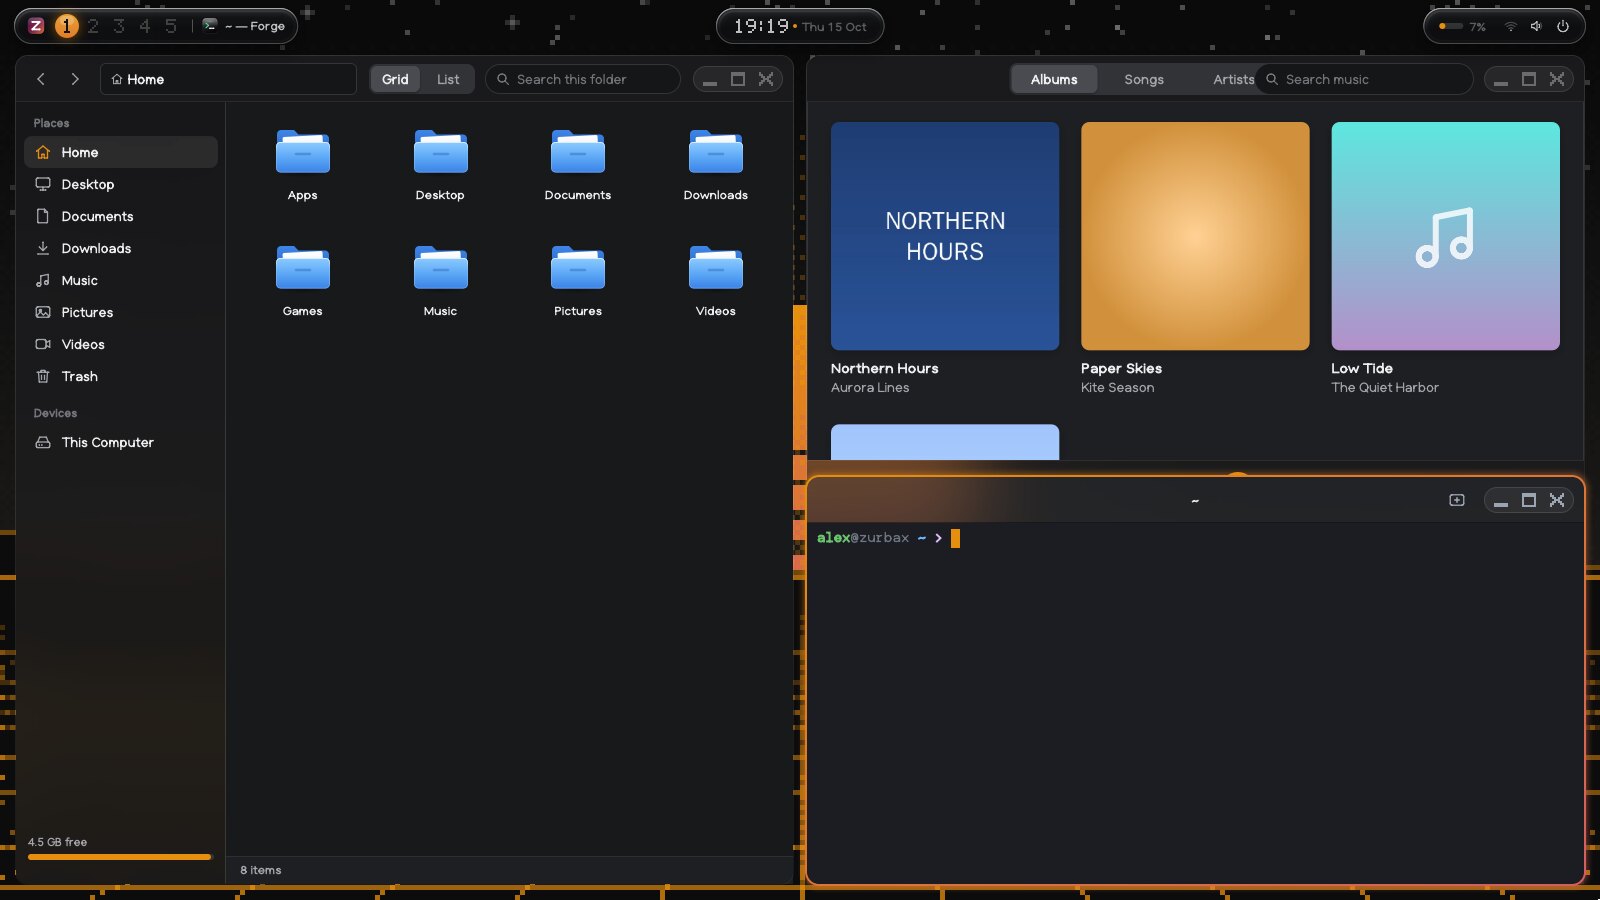
Zurbax starts on Hive, a tiling desktop: windows share the screen side by side instead of piling up, and everything is a keystroke away. Super is the Windows key.
- The bar floats at the top as three islands of glass: your workspaces on the left (with the windows you've put away), the date and time in the middle, and battery, Wi-Fi, sound and power on the right.
- Apps: press Super + Space, type a few letters of the name and press Enter. The app opens in a tile of its own.
- Tiles: each new window splits the one in focus. Focus follows the pointer; move it with Super + arrows, swap with Shift added, resize with Ctrl added.
- Workspaces: nine of them, on Super + 1 to 9. The screen slides across.
- Window buttons are drawn in pixels at the top right of each window: put away, zoom over the others, close.
- Prefer windows you move about? Settings › Appearance › Desktop has Classic, with a taskbar and windows that overlap.
Keyboard shortcuts
Super + K shows all of them on the screen.
| Super + Space | The launcher: every app, by name |
| Super + Return | A terminal |
| Super + W | Close the window in focus |
| Super + Z | Zoom it over the others, or back |
| Super + V | Float it above the tiles, or tile it again |
| Super + J | Split the other way |
| Super + 1…9 | Go to a workspace (add Shift to take the window along) |
| Super + arrows | Move the focus (add Shift to swap, Ctrl to resize) |
| Super + Ctrl + Space | The next theme |
| Super + B, F, M, , | Web, Files, Music, Settings |
| Super + Esc | Lock, sign out, restart or shut down |
| Print Screen | Take a screenshot (saved in Pictures › Screenshots) |
| F11 | Full screen, which also turns on game mode |
| AltGr + S, T, A, I | ș ț ă î, on every keyboard layout |
Apps
Zurbax has its own apps for the everyday: Files, Web, Mail, Music, Photos, Calendar, Notes, Writer, Dashboard, Weather, Clock, Calculator and more, all in Applications.
Harbor is the app store. Its Flathub section brings thousands more: Firefox, Discord, Spotify, GIMP, OBS, VLC and the rest. Press Install on an app's page; it appears in Applications when it's ready. Remove an app from Harbor's Installed tab.
Already installed: Firefox, LibreOffice, VLC, GIMP, Celluloid, Boxes, Heroic and ProtonPlus.
Games
- 1
Open Steam
Press Super + Space, type steam and press Enter. Sign in with your Steam account; Steam starts in Big Picture, made for the couch and a controller.
- 2
Turn on Proton for Windows games
In Steam, open Settings › Compatibility and turn on Enable Steam Play for all other titles. Most Windows games then install and play like any other.
- 3
Plug in a controller
Xbox, PlayStation, Switch Pro and Steam controllers work as soon as they're connected, by cable or Bluetooth, with rumble.
Epic, GOG and Amazon games: open Heroic, sign in, and install from there. Newer Proton versions (Proton-GE and others) come from ProtonPlus. Lutris, Bottles and RetroArch are in Harbor.
Press F11 in any game window for full screen and game mode, which keeps notifications quiet.
Two desktops
Zurbax has its own desktop, and GNOME too. On the lock screen, choose which one you want before signing in. Both use the same files, wallpapers and taskbar. GNOME comes with its own Settings, Files, Console, Text Editor, Weather, Maps, System Monitor, Software and more.
Settings
Open Settings from Applications.
- Appearance: the desktop (Hive or Classic), the theme (Carbon or Midnight), the accent colour and the wallpaper; transparency and the pixel style can be turned off under Accessibility. With Classic, the taskbar's size, colour and position too.
- Network and Bluetooth: Wi-Fi networks, wired connections, and pairing headphones, mice and controllers.
- Display and Sound: resolution and scale, night light, outputs and volume.
- Users: your name, picture and password.
- Privacy & Security: updates, how long your version is supported, the protections that are on, clipboard history and locking when the computer sleeps.
- Date & Time, Keyboard, Mouse & Touchpad, Screen Time and About, which shows the version and your computer's parts.
Updates and security
Zurbax 2.2 is a long-term support (LTS) release: it gets security updates every two weeks until October 2028. Each one brings the newest kernel from Linux's long-term branch and fixes for Zurbax itself.
- They install on their own. Zurbax checks once a day, downloads an update in the background and tells you when it's ready. Restart to finish; your apps, files and settings stay as they are.
- Only real updates install. Every update is signed by Zurbax, and every file in it is checked against its fingerprint before it goes in. Anything else is thrown away.
- The version before is kept next to the new one when there's room, as ZURBAX.OLD on the startup partition.
- To check yourself, open Settings, then Privacy & Security, and choose Check Now. You can turn automatic updates off there too.
What protects the computer, all on from the start: a kernel nothing can change while it runs (not even the administrator), programs that load at a random place each time, stack canaries and zeroed memory, apps that can't read each other's memory, sandboxed Flatpak apps, and nothing that listens to the network. Zurbax collects nothing about you.
When something's wrong
The stick doesn't show up in the boot menu
Make the stick again with balenaEtcher, and try another USB port (on desktops, one on the back). Turn off Secure Boot, and make sure the computer is set to start in UEFI mode, not "Legacy" or "CSM".
The screen stays black
Give it a minute on the first start. Then try another video output (HDMI or DisplayPort) on the graphics card itself, not the motherboard. On laptops with two graphics chips, the built-in one drives the screen.
The installer says no disks were found
Some computers hide their disks behind Intel RST or RAID. In the computer's setup, set the storage mode (SATA mode) to AHCI. If Windows is installed, switch Windows to AHCI first, or it won't start afterwards. Disks with 4K sectors aren't supported yet.
There's no Wi-Fi
Zurbax has the firmware for nearly every Wi-Fi chip. Check that Wi-Fi is on in the quick settings and that the computer has no Wi-Fi switch turned off. Networks that need a company login (WPA-Enterprise) aren't supported yet; a cable always works.
There's no sound
Open the quick settings and check the volume and the output (speakers, headphones or HDMI). In Settings › Sound, choose the right output.
A Windows game won't start
Check that Steam Play is on (see Games). In the game's Properties › Compatibility, try a different Proton version, or a Proton-GE from ProtonPlus. Games with anti-cheat that blocks Linux won't run.
I forgot my password
Start from the Zurbax stick, choose Install, and reinstall Zurbax on its disk. This replaces Zurbax's storage, so keep copies of your files elsewhere.
Removing Zurbax
If Zurbax is next to Windows and you want the space back:
- 1
Start Windows
Use the boot menu key and choose Windows Boot Manager.
- 2
Delete Zurbax's partition
Right-click Start, open Disk Management, right-click the partition called ZURBAX-DATA and choose Delete Volume.
- 3
Give the space back
Right-click your Windows partition (C:) and choose Extend Volume.
- 4
Start Windows by default
In the computer's setup, put Windows Boot Manager first in the boot order. You can turn Secure Boot back on now.
If Zurbax has the whole disk, install another system over it.
Try it on an iPad or Mac
No PC at hand? UTM runs Zurbax in a window on an iPad, an iPhone or a Mac, by pretending to be a PC. It's free: UTM SE on the App Store for iPad and iPhone, or UTM for the Mac.
- 1
Download the small image
For a virtual machine, the small image is all you need: zurbax-mini.iso, 140 MB. It has the whole desktop and every Zurbax app, without the PC drivers and Steam. In Safari it goes to Files, in Downloads.
- 2
Make the machine
In UTM, press +, then Emulate, then Other. For the boot device choose CD/DVD Image, press Browse and pick zurbax-mini.iso.
- 3
Hardware
Architecture x86_64, system Standard PC (Q35), memory 2048 MB (or 3072 if your device has 6 GB or more), 2 CPU cores. Storage: 8 GB is plenty. Skip the shared folder, name it Zurbax and save.
- 4
Check one setting
Before the first start, edit the machine. Under QEMU, check that UEFI Boot is on. The CPU can stay on UTM's default.
- 5
Start it, and wait
Press play. UTM SE can't use the iPad's full speed, so be patient: the Zurbax logo shows after a minute or three and the Welcome window after five to ten. Choose Try Zurbax.
Questions
Is Zurbax free?
Yes. No accounts, no ads, no tracking.
Is it Linux?
It runs on the Linux kernel, which is how it supports so much hardware. Everything above the kernel, from the desktop to the apps, is Zurbax's own. Linux apps from Flathub and Windows games through Proton run on it too.
Can I keep Windows?
Yes. Choose Install alongside Windows and both stay on the computer. Pick one in the boot menu each time it starts.
Do I need an NVIDIA, AMD or Intel version?
No. The one image has the drivers for all of them. AMD and Intel graphics work fully. NVIDIA works through nouveau, the open driver: GeForce RTX 30 and 40 from the first start, while other NVIDIA cards may run slower or not yet.
Can I try it without a PC?
Yes, in UTM on an iPad, iPhone or Mac: see Try it on an iPad or Mac.
Does it work on a Mac?
On Macs with Intel chips, yes: hold Option at start-up to choose the stick. Macs with Apple chips (M1 and later) aren't supported.
Ready?
Download Zurbax 2.2